- Have any flooring questions?
- 631-673-1050
- [email protected]

What are the essential tools and equipment needed for a professional-looking DIY installation of each flooring type?

How Do Seasonal Temperature and Humidity Changes Affect Different Flooring Types?
July 24, 2025
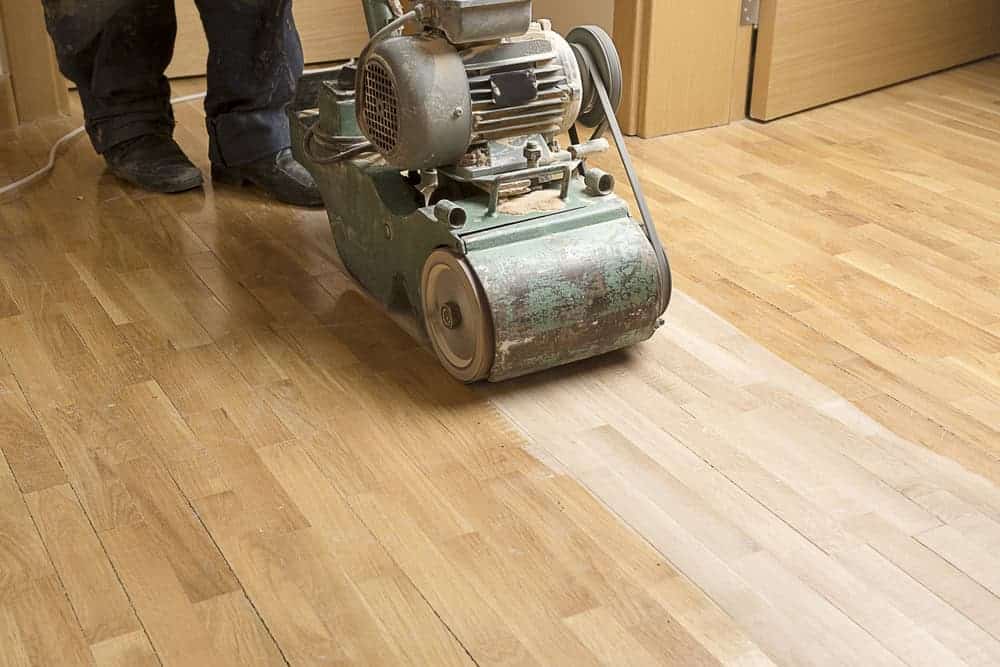
How to Prepare Your Subfloor for New Hardwood Floors
August 7, 2025What are the essential tools and equipment needed for a professional-looking DIY installation of each flooring type?
Summary:
Core Tools for Hardwood Floor Installation
A proper hardwood flooring installation requires accuracy, but not an entire catalog of specialized equipment. Your focus should be on the tools that address the three main tasks: cutting boards to length, fastening them securely, and keeping uniform spacing. Every tool that is truly necessary serves one of these purposes. Anything else is likely a convenience item. Failing to use the correct tools for these basic steps can result in gaps, squeaks, and an uneven appearance that detracts from the value of your home.
Equipment for Measuring and Cutting Hardwood
A 10-inch compound miter saw is the workhorse of your hardwood project. It manages approximately 99% of cuts, including the angled ones around trim that distinguish a polished job from an amateur one. You will make hundreds of cuts, so trying to get by with a less precise saw will lead to visible errors. A table saw is also needed when installing solid hardwood, as you will need to rip boards lengthwise for the first and last rows. This process creates the straight, clean edges required for a uniform look.
Your measuring instruments are just as important. A 25-foot tape measure, a speed square, and a chalk line are fundamental for keeping your rows parallel. Even a small measurement error in the first row will become magnified across the room. Lastly, a pull bar and tapping block are inexpensive but vital. They allow you to draw boards together tightly without damaging the tongue-and-groove system, preventing the small gaps that signal a DIY installation.
Fastening Tools for a Solid Hardwood Installation
While you could technically install hardwood with a drill and finish nails, a pneumatic flooring nailer is the tool that makes the job manageable and produces superior results. This tool drives fasteners through the tongue of each board at a consistent angle, securing it to the subfloor without any visible nail heads. The process is faster and greatly reduces the chance of splitting expensive planks. Most tool rental stores offer flooring nailers.
If your project involves engineered hardwood, an 18-gauge brad nailer with 1.5-inch nails is often a suitable and more affordable alternative. For the initial and final rows where a nailer won’t fit, you will use a drill to create pilot holes and then drive finish nails. A nail set helps you sink the nail heads just below the wood surface, which you can then conceal with wood filler for a clean finish. Also, a 6-gallon air compressor is a helpful companion, as it can keep up with the nailer without frequent pauses to recharge.
Tool Requirements for Vinyl and Laminate Flooring
Vinyl and laminate flooring use similar floating installation techniques, so their tool lists are nearly identical. These projects depend more on exact cuts and a well-prepared subfloor than on fastening equipment. The main advantage of these floating floor systems is their simpler installation method. You will not be nailing or gluing planks to the subfloor. This reduces the number of tools you need, but it also means the tools you do use must be up to the task to achieve a clean and lasting result.
Cutting Tools for Laminate and Vinyl Planks
A miter saw is still the best option for cutting laminate flooring, but luxury vinyl plank (LVP) can be cut cleanly with a sharp utility knife using the “score and snap” method. This technique eliminates sawdust and makes the work go much faster. When cutting laminate, your miter saw must have a fine-tooth blade (80-tooth or higher) designed for this material to prevent chipping the top wear layer. A jigsaw is indispensable for both materials when you need to make intricate cuts around vents, pipes, or complicated door casings. Using a fine-tooth blade and cutting from the back of the plank helps hide any minor chipping. For vinyl, a resolved vinyl tile cutter operates like a paper cutter for quick, straight cuts. Using a hook blade in your utility knife can also help with curved cuts. Remember that transition pieces and moldings for these floors also require precise miter cuts to look right.
Preparation and Installation Tools for Floating Floors
Floating floors will show any subfloor imperfection. Use a 4-foot or longer level to find high and low spots, which must be corrected before you begin. Most product instructions specify a flatness tolerance, commonly no more than a 3/16-inch dip over a 10-foot span. Low spots can be addressed with a self-leveling compound.
Spacers are used to maintain a consistent expansion gap around the room’s perimeter. This gap is necessary because floating floors expand and contract with humidity shifts. A rubber mallet, tapping block, and pull bar are used to gently engage the locking mechanism of the planks without causing damage. Finally, invest in a good pair of knee pads. You will spend hours on the floor, and being comfortable helps you maintain the quality of your work from start to finish.
Achieving Quality Results Through Smart Tool Choices
The visible quality of a DIY flooring project often comes down to using the right tools. Investing in the correct equipment from the start protects your investment in materials and saves a great deal of time. For expensive, single-use tools like a flooring nailer, renting is a sensible financial decision. Reserve your tool budget for items you will use again for other home projects.
When you are prepared to start your flooring project, remember that a little guidance can be valuable. At Bob McGowan Wood Flooring, our background working on homes across Long Island provides us with the insight to help you succeed. Sometimes, recognizing when professional guidance can make a significant difference is the wisest DIY choice. Contact us for assistance.
